DTeam 技术日志
Doer、Delivery、Dream
Spec Driven API开发思想在Grails REST工程上的运用
前言
在前后台分离的开发中,后端需要维护一套 REST API。在开发中 API 少不了要有变更。在传统的开发中,通常我们是需要手写大量的 API 说明文档交给前端开发,或者暴露出去交给第三方开发者使用。编写说明文档需要耗费大量的精力,并且有更新不及时和错漏的问题,而且如果 API 量一大又很难发现,给使用者造成困扰。如果连 API 文档都没有,只靠口头交流,那么效率低下可想而知,大量的时间都将花费在前后端开发在交流 API 的用法上。而本文我们将讨论如何一步步改善这种做法,让 API 的编写变得更及时更有效。
API 的规范说明书(API Specification)
在早年的开发的时候,我们在开发完服务端的时候,通常都会手写一份 API 文档交给用户,告诉他们怎么使用,有哪些接口,请求参数是什么?响应参数是什么等等,比如像下面这样的:
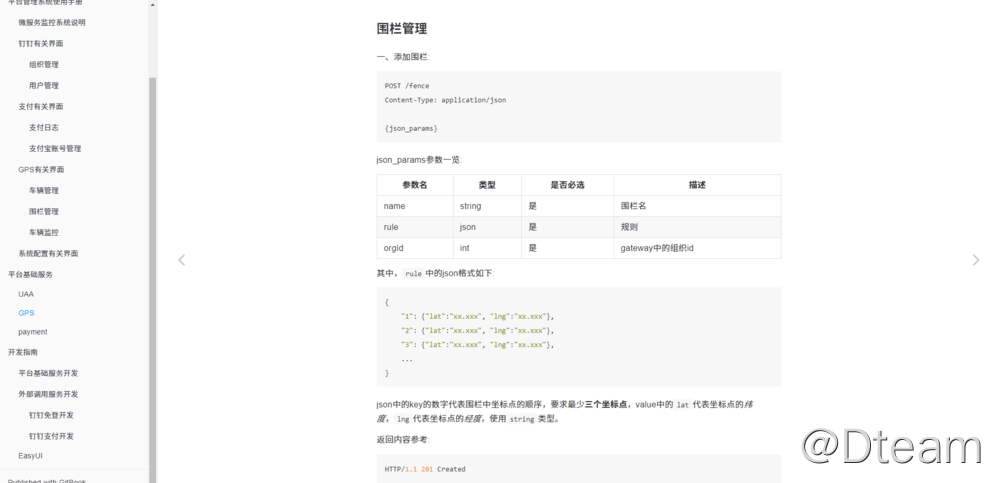
幸运的是,借助Markdown, Asciidoc这一类的轻量级标记语言,我们不需要完完整整的写 HTML 这么麻烦,配合上比较通用的 REST 接口请求描述,也能像模像样的写出来这样一份 API 说明文档交给用户。
但是总这么写也不是事啊,这样一份文档整理出来,也要花不少时间,而且可能存在错漏。对于一个已完成的项目还好说,对于一个还在开发中的项目来说,非常容易造成更新不及时的问题,而且更新也比较费时费力。不同人写出来的文档还可能风格不统一。
由于 Restful 的风格有一些列通用的特点,基于此,市面上诞生了一系列 API 规范,用简单的配置或语言(通常是 JSON 和 YAML)描述 API 的特征,我们称之为 API Specification。这些规范的好处是人类易读易理解,机器可读可解析,便于转换为多种统一规范的格式。以后我们只需要写个简单的规范说明书,剩下的交给机器去干就可以了。
目前市面上流行的几种规范主要有RAML, OpenAPI, API Blueprint等。简单的互比参考: https://modeling-languages.com/modeling-web-api-comparing/
最终我们基于流行度和工具支持情况来看,最终选择了OpenAPI 3作为我们的 API 规范。
OpenAPI 3
OpenAPI 规范定义了一个标准的,语言无关的 Restful API 描述说明。OpenAPI 3.0 规范基于 Swagger 2.0 规范改进而来,在 Swagger 2.0 的基础上扩充了大量的新特性。OpenAPI 3 支持 JSON 和 YAML 配置格式。由于 YAML 相比 JSON 更易读,因此下面我们都用 YAML 配置。
OpenAPI 3 的教程详见Swagger 教程和 OpenAPI 3 规范官方文档,以及这个教程
参考 OpenAPI 3 的规范,我手写了一份登录接口和刷新 JWT 接口的描述:
openapi: 3.0.2
info:
  title: 我的测试
  description: 获取当前项目的API
  version: "1.0"
servers:
  - url: "http://locahost"
    description: 项目服务器地址
paths:
  /api/login:
    post:
      tags:
        - login
      summary: 登录
      description: 用户登录接口
      requestBody:
        content:
          application/json:
            schema:
              type: object
              required:
                - username
                - password
              properties:
                username:
                  type: string
                password:
                  type: string
              example:
                username: "17711111111"
                password: "888888"
      responses:
        "200":
          description: 登录成功
          content:
            application/json:
              schema:
                $ref: "#/components/schemas/loginSuccess"
        "401":
          $ref: "#/components/responses/UnauthorizedError"
  /oauth/access_token:
    post:
      tags:
        - login
      summary: 刷新JWT
      description: 刷新JWT的接口
      requestBody:
        content:
          application/x-www-form-urlencoded:
            schema:
              type: object
              required:
                - grant_type
                - refresh_token
              properties:
                grant_type:
                  type: string
                  description: 必填(refresh_token)
                refresh_token:
                  type: string
                  description: 之前登陆成功返回内容中的refresh_token字段
            example:
              grant_type: refresh_token
              refresh_token: eyJlbmMiOiJBMTI4R0NNIiwiYWxnIjoiUlNBLU9BRVAifQ.xxxx.xxxx
      responses:
        "200":
          description: 刷新JWT成功
          content:
            application/json:
              schema:
                $ref: "#/components/schemas/loginSuccess"
        "401":
          $ref: "#/components/responses/UnauthorizedError"
  /api/self:
    get:
      security:
        - bearerAuth: []
      tags:
        - user
      summary: 用户信息
      description: 获取用户个人信息
      responses:
        "200":
          description: 成功获取个人信息
          content:
            application/json:
              schema:
                $ref: "#/components/schemas/userDetailInfo"
components:
  schemas:
    userSimpleInfo:
      type: object
      required:
        - id
        - username
        - displayName
      properties:
        id:
          type: integer
          description: 用户id
          example: 1
        username:
          type: string
          description: 用户登录手机号
          example: 13500000001
        displayName:
          type: string
          description: 用户昵称
          example: 我的昵称
    userDetailInfo:
      allOf:
        - $ref: "#/components/schemas/userSimpleInfo"
        - type: object
          properties:
            dateCreated:
              type: string
              format: date-time
              description: 用户创建时间
              example: "2018-11-01T00:00:00"
            passwordExpired:
              type: boolean
              description: 密码是否过期
              example: false
            rate:
              type: integer
              description: 用户排名
              example: 10
    loginSuccess:
      type: object
      required:
        - username
        - roles
        - userId
        - displayName
        - token_type
        - access_token
        - expires_in
        - refresh_token
      properties:
        username:
          type: string
          description: 用户名
          example: "17711111111"
        roles:
          type: array
          description: 角色
          items:
            type: string
            enum:
              - ROLE_ADMIN
              - ROLE_KF
              - ROLE_BUYER
              - ROLE_SELLER
          example:
            - ROLE_BUYER
            - ROLE_KF
        userId:
          type: integer
          description: 用户id
          example: 1
        displayName:
          type: string
          description: 展示名
          example: 我的用户
        token_type:
          type: string
          default: Bearer
          description: JWT类型(默认Bearer)
          example: Bearer
        access_token:
          type: string
          description: JWT主体内容
          example: eyJlbmMiOiJBMTI4R0NNIiwiYWxnIjoiUlNBLU9BRVAifQ.xxxx.xxxx
        expires_in:
          type: integer
          default: 3600
          description: 过期时间
          example: 3600
        refresh_token:
          type: string
          description: 刷新token,用于访问refresh接口
          example: eyJlbmMiOiJBMTI4R0NNIiwiYWxnIjoiUlNBLU9BRVAifQ.xxxx.xxxx
  responses:
    UnauthorizedError:
      description: JWT未发送、非法,或已过期
  securitySchemes:
    bearerAuth:
      type: http
      scheme: bearer
      bearerFormat: JWT
      description: 通过*login*接口获取到的*access_token*字段
不需要像以前手写 markdown 那样写一堆,我们只写一个这样的配置文件就行了。这样我们在很多支持 OpenAPI 3 的 UI 或工具中就可以预览、转换,或直接生成更完整的 html 文档,甚至有些服务商还提供根据 OpenAPI 3 规范直接生成 Mock 服务器的功能。比如在 Swagger Editor 就可以直接预览:

在stoplight.io中预览的效果如下:
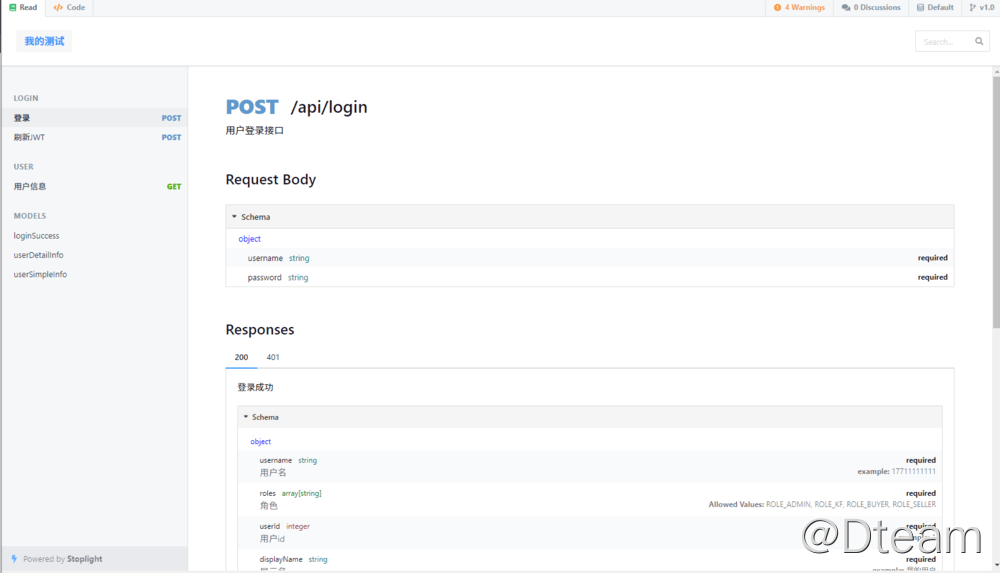
明显可以看到这种方式产生的 API 文档比手写的交互性更强,表现形式更丰富(比如 Swagger Editor 支持直接生成 vertx 服务端源码,stoplight.io 支持生成客户端片段代码等功能),而且文档风格统一。
使用代码生成 OpenAPI 3 规范
上述例子可以看到使用统一的 API 规范好处非常大。但是上述例子仍没有摆脱手写的弊端——工作量太大、缺乏验证、修改之后容易忘记手工同步。因此就有些人想出了一些办法了,能不能在开发阶段中就产生对应的接口文档呢?这样不但不容易错漏,而且容易修改,由机器生成,避免了全手工书写 API Specification 造成的错漏。于是 Swagger 项目就在这个方向上大放光彩。
对于 spring boot 项目可以直接使用springfox项目,进一步减少手写量,可以参考官方Demo。
在 Application 入口初始化 Bean,在 controller 上直接加入注解,在项目编译的时候就可以产生对应的 API 配置。减少了手写的错漏,一定程度上也可以减少很多工作量。
Spec Driven API Development
上述在业务代码中通过注解生成 OpenAPI 规范的做法是很多人容易想到的,也是容易上手使用的一种方式。但仍然没有解决以下的问题:
- 缺乏测试
- 在功能代码中夹杂着太多的 OpenAPI 生成部分的配置和注解。这些代码与功能无关
- 大量的注解跟代码注释有同样的弊端——没人想到维护,愿意维护了
比如这样的:
@Path("/{userName}")
@Produces(MediaType.APPLICATION_JSON)
@ApiOperation(value = "Returns user details", notes = "Returns a complete list of users details with date of last modification.", response = User.class)
@ApiResponses(value = {
 @ApiResponse(code = 200, message = "Successful retrieval of user detail", response = User.class),
 @ApiResponse(code = 404, message = "User does not exist"),
 @ApiResponse(code = 500, message = "Internal server error")}
)
public Response getUser(@ApiParam(name = "userName", value = "Alphanumeric login to the application", required = true) @PathParam("userName") String userName) {
 ...
}
功能代码被淹没在大量的注解当中,和大段注释一样,最终就成了代码垃圾,徒增产品包容量而已。
于是有另一种思想产生了: Spec Driven API Development
这种实践的一些理论基础可以参见这篇文档,写的比较好,有比较详细的论述: https://dzone.com/articles/api-best-practices-plan-your-0
这种思想与上述注解方案的区别在于:
- 不使用任何注解,不在功能代码中产生 API 文档
- 通过集成测试阶段反向生成 API 文档,保证每个生成的 API 接口文档都是经过测试的
这样就不会因为要生成 OpenAPI 而在产品打包编译过程中引入额外的依赖,自然也不需要在功能代码中引入很多奇奇怪怪的配置。而且是跑在集成测试中,通过集成测试中接口的请求和响应产生 OpenAPI 文档,这样可以最大限度的保障产生的 API 文档都经过测试的,接口修改之后也能第一时间在测试中发现问题,及时修改接口文档。
Sping 全家桶中就有一个Spring REST Docs项目,基于这种思想理论开发的项目。
Spring REST Docs 简介
官方就有 Grails 使用的范例,详细的使用看范例就好了,这里做一下简单的说明。
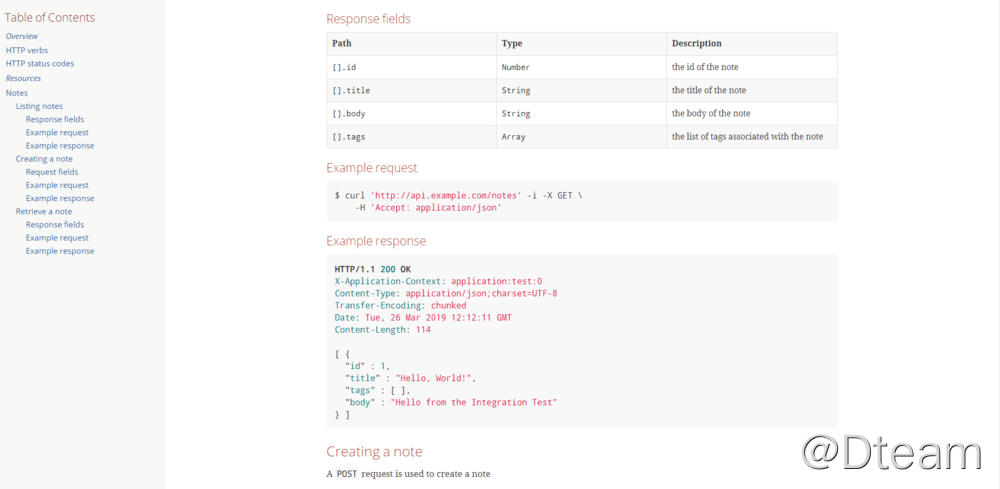
Spring REST Docs 期望用户手写一部分文档(使用 Asciidoc 或 Markdown,官方推荐首选 Asciidoc),将接口请求和响应部分使用模板引用替代。在集成测试结束后,Spring REST Docs 将生成这部分的 asciidoc 文档,填充到你的手册部分,这样整个文档就完成了。 效果类似于这样的:
Spring REST Docs 当前(2.0 以上版本)支持的 REST client 有三个 Spring MVC’s test framework,Spring WebFlux’s WebTestClient 和 REST Assured 3。
在集成测试中初始化任意一个 client 之后,在测试中产生对应 API 描述文档的范例代码类似于这样(Spring MVC test framework):
private MockMvc mockMvc;

@Autowired
private WebApplicationContext context;

@BeforeMethod
public void setUp(Method method) {
	this.mockMvc = MockMvcBuilders.webAppContextSetup(this.context)
			.apply(documentationConfiguration(this.restDocumentation))
			.build();
	this.restDocumentation.beforeTest(getClass(), method.getName());
}

this.mockMvc.perform(get("/").accept(MediaType.APPLICATION_JSON))
	.andExpect(status().isOk())
	.andDo(document("index"));
测试通过就会根据客户端的测试处理,生成文档片段。
Spring REST Docs API specification Integration
如果理解了 Spring REST Docs 的套路,让我们再更进一步。很容易发现 Spring REST Docs 在使用前还得先写一堆类似于 README 的标记型文档,恐怕没几个程序员喜欢写这么一大段 README 一样的东西。而且生成的也不是 OpenAPI 3 Spec,而是标记文档,基本只能进一步转换成 html 或者 PDF,不像 OpenAPI 那样还能在 UI 中进行丰富的交互。因此,诞生了Spring REST Docs API specification Integration这个项目。
该项目基于 Spring REST Docs,在此之上进行封装,不是生成 Asciidoc 或 Markdown,而是生成 OpenAPI 2, OpenAPI 3, Postman 的 Spec。
我们的grails-rest-seed项目就使用了这个插件产生 OpenAPI 文档。比如产生获取阿里云 OSS 上传签名的文档部分代码如下(使用 REST Assured 3 测试):
package top.dteam.earth.backend.operation

import com.epages.restdocs.apispec.ResourceSnippetParameters
import grails.gorm.transactions.Rollback
import grails.testing.mixin.integration.Integration
import io.restassured.builder.RequestSpecBuilder
import io.restassured.http.ContentType
import io.restassured.specification.RequestSpecification
import org.junit.Rule
import org.springframework.restdocs.JUnitRestDocumentation
import org.springframework.restdocs.payload.FieldDescriptor
import spock.lang.Specification
import top.dteam.earth.backend.user.User
import top.dteam.earth.backend.utils.TestUtils

import static com.epages.restdocs.apispec.ResourceDocumentation.headerWithName
import static com.epages.restdocs.apispec.ResourceDocumentation.resource
import static com.epages.restdocs.apispec.RestAssuredRestDocumentationWrapper.document
import static io.restassured.RestAssured.given
import static org.springframework.http.HttpHeaders.AUTHORIZATION
import static org.springframework.restdocs.operation.preprocess.Preprocessors.prettyPrint
import static org.springframework.restdocs.payload.PayloadDocumentation.fieldWithPath
import static org.springframework.restdocs.restassured3.RestAssuredRestDocumentation.documentationConfiguration

// TODO: 写一个BaseApiDocSpec模板类或trait,自动初始化REST Assured
@Integration
@Rollback
class AliyunOSSApiDocSpec extends Specification {

    @Rule
    JUnitRestDocumentation restDocumentation = new JUnitRestDocumentation()

    private RequestSpecification documentationSpec

    FieldDescriptor[] response = [
            fieldWithPath("accessKeyId").description("OSS的access key id")
            , fieldWithPath("policy").description("OSS的权限矩阵")
            , fieldWithPath("signature").description("OSS认证成功后的签名")
            , fieldWithPath("dir").description("有权限上传的目录")
            , fieldWithPath("host").description("OSS访问主机")
            , fieldWithPath("expire").description("授权过期时间")
            , fieldWithPath("cdnUrl").description("用于外部访问的CDN URL(可空)").optional()
    ]

    void setup() {
        this.documentationSpec = new RequestSpecBuilder()
                .addFilter(documentationConfiguration(restDocumentation)
                        .operationPreprocessors().withResponseDefaults(prettyPrint()))
                .setPort(serverPort)
                .build()
        TestUtils.initEnv()
    }

    void cleanup() {
        TestUtils.clearEnv()
    }

    void '所有登录用户均有权限获取上传权限 - apidoc'() {
        setup:
        User.withNewTransaction {
            TestUtils.createUser('ROLE_ADMIN', '13500000001')
        }
        String jwt = TestUtils.login(serverPort, '13500000001', '13500000001')

        expect:
        given(this.documentationSpec).accept(ContentType.JSON)
                .filter(document("getUploadAuthority"
                        , resource(ResourceSnippetParameters.builder()
                        .summary('获取阿里云OSS上传权限')
                        .description('获取阿里云OSS的上传权限的签名字符串及目录等配置,具体用法请参考[服务端签名后直传](https://help.aliyun.com/document_detail/31926.html)')
                        .responseFields(response)
                        .requestHeaders(headerWithName(AUTHORIZATION).description('JWT'))
                        .tags('operation')
                        .build())))
                .header(AUTHORIZATION, "Bearer ${jwt}")
                .when().get("/api/getUploadAuthority")
                .then().assertThat().statusCode(200)
    }
}
为了不影响以前的功能测试,单独产生一个独立的测试运行类AliyunOSSApiDocSpec专门用于产生 OpenAPI 3 的文档。最终产生的 OpenAPI 3 Spec 如下:
openapi: 3.0.1
info:
  title: Grails-rest-seed API
  description: Grails-rest-seed API文档
  version: "1.0"
servers:
  - url: http://localhost:8080
tags:
  - name: operation
    description: 后台操作部分的相关接口
paths:
  /api/getUploadAuthority:
    get:
      tags:
        - operation
      summary: 获取阿里云OSS上传权限
      description: 获取阿里云OSS的上传权限的签名字符串及目录等配置,具体用法请参考[服务端签名后直传](https://help.aliyun.com/document_detail/31926.html)
      operationId: getUploadAuthority
      parameters:
        - name: Authorization
          in: header
          description: JWT
          required: true
          schema:
            type: string
          example: Bearer eyJhbGciOiJIUzI1NiJ9.eyJwcmluY2lwYWwiOiJINHNJQUFBQUFBQUFBSldTdjI4VE1SVEhmYUZWS2lKQml3UVNRMWtvRWtMSW9WUk1tZm9MQkxxbWlKQ2xTQ0RuXC9IcDE2N01QMjlmbUZwUUpoZzVCUUNVa1Joajdsd0FMZndDQ2diVnpKeVNlTDJrdm1TcTgzTmwrN1wvTjk3K3QzZUVRbXJTRzNuRTRwZDhBU0NzeTRMZHBoMFE0b1RqTUxocTdsYmZ5c2dHTkNXdVArM3Z4NjNQOWNJVUZJYWx6WVZMSzh5Ukp3NUZLNHpYWlpYVElWMTF2T0NCVTN1b1lzeE1ibjBWUm1zVkRVcHY3Q1FwUVo0ZkpDZ0FcL0k5RUVSNkxYSVlBV0ZTRVh3Y2ZaNlp4c2k1OWwzdFltSHhFMkROZXhwczBOUDJaRTJNQ1pRb29NdkZWTGRJRE1zaW5TbVhGT3IxVzRxRFBBTk1sMmVoUnBkd0tQTEVkNkFjb0pKT3hwYUJjVTZFamdhd1RLM3BWRlZnSFhrNHFEWXpBbFpiNEZyaEdRcVpkWmlkZndsZWVWN212SmxLYXk0MkhmVEFCZSt3dzJmUjMwZVhkWlNZcGRDS3p2WFZvbm1ZbE40TWVUMVp0XC85NkhcL3F0U3VFb0FlM3o4NHB6Njh1a2Q2MzU4ZlhDbU9EeUpFckk2V1dZWTF1aXRYTWxPU25Ccnp5ejQrUDN4OGN2WGwyRHBWOXhQM1wvOTM5dWNlaFV2cXlUbEJubTlNaWJJSFp2d3Y4amZPbHMrSW5yT1cySkpKV0FFNlFjOEZPSkVvenRUaGd0VFwveDI1UHlUOVhEMXhlTEsyc09tMzlibUYrN2RHYXg1MUw1UXRPNm5qWVlhNTNqXC96OXZ2XC9ldVwva1BPSVRPNHltUUU2UDEwR05iT2tBK2IxNGNGczdjUHZcL2FLUDRReFh4OW5cL0FQckFjVUZ4QXdBQSIsInN1YiI6IjEzNTAwMDAwMDAxIiwicm9sZXMiOlsiUk9MRV9BRE1JTiJdLCJpc3MiOiJTcHJpbmcgU2VjdXJpdHkgUkVTVCBHcmFpbHMgUGx1Z2luIiwiZXhwIjoxNTUzNzg3MDAwLCJpYXQiOjE1NTM3ODM0MDB9.HOfTfxF519uhAhewNH2_5KbQOxfBlZucOWhsXZc_88w
      responses:
        200:
          description: "200"
          content:
            application/json:
              schema:
                $ref: "#/components/schemas/api-getUploadAuthority2026114897"
              examples:
                getUploadAuthority:
                  value: "{\r\n  \"accessKeyId\" : \"mock\",\r\n  \"policy\" : \"\
                    eyJleHBpcmF0aW9uIjoiMjAxOS0wMy0yOFQxNDozNTowNi4zMTFaIiwiY29uZGl0aW9ucyI6W1siY29udGVudC1sZW5ndGgtcmFuZ2UiLDAsMTA0ODU3NjAwMF0sWyJzdGFydHMtd2l0aCIsIiRrZXkiLCIxMzUwMDAwMDAwMSJdXX0=\"\
                    ,\r\n  \"signature\" : \"JRQ9/xJ2aGAsQ5D2vh8IRFWh29I=\",\r\n \
                    \ \"dir\" : \"13500000001\",\r\n  \"host\" : \"https://mock.oss-cn-hangzhou.aliyuncs.com\"\
                    ,\r\n  \"expire\" : 1553783706311,\r\n  \"cdnUrl\" : \"mock\"\r\
                    \n}"
      security:
        - bearerAuthJWT: []
components:
  schemas:
    api-getUploadAuthority2026114897:
      type: object
      properties:
        accessKeyId:
          type: string
          description: OSS的access key id
        signature:
          type: string
          description: OSS认证成功后的签名
        cdnUrl:
          type: string
          description: 用于外部访问的CDN URL(可空)
        expire:
          type: number
          description: 授权过期时间
        host:
          type: string
          description: OSS访问主机
        dir:
          type: string
          description: 有权限上传的目录
        policy:
          type: string
          description: OSS的权限矩阵
  securitySchemes:
    bearerAuthJWT:
      type: http
      scheme: bearer
      bearerFormat: JWT
在 Swagger Editor 中也能预览:

总结
本章节中我们总结了一些 REST 服务端在开发中产生 API 文档的一些实践,以及一种新的开发思路 Spec-Driven Development。并且在实际的项目中成功运用这种思路解决实际的问题,大大提高了实际开发的效率。
觉得有帮助的话,不妨考虑购买付费文章来支持我们 🙂 :
付费文章