DTeam 技术日志
Doer、Delivery、Dream
Passport认证进阶
简介
《Passport 认证小记》中介绍了 passport-discord 和 passport-google 进行认证,细心的读者会发现,示例代码中有些重复的代码。如果使用三种以上的 OAuth2 的 provider 进行认证,重复代码会更多。这里我们可以直接使用 passport-oauth2。本文以 Discord、Github 为例,介绍如何使用passport-oauth2 进行认证。
准备工作
这里同样需要准备好 Discord 和 Github 的 ClientID 和 ClientSecret。这里仅介绍 Github 的配置,Disord 的配置参考《Passport 认证小记》。
配置 Github
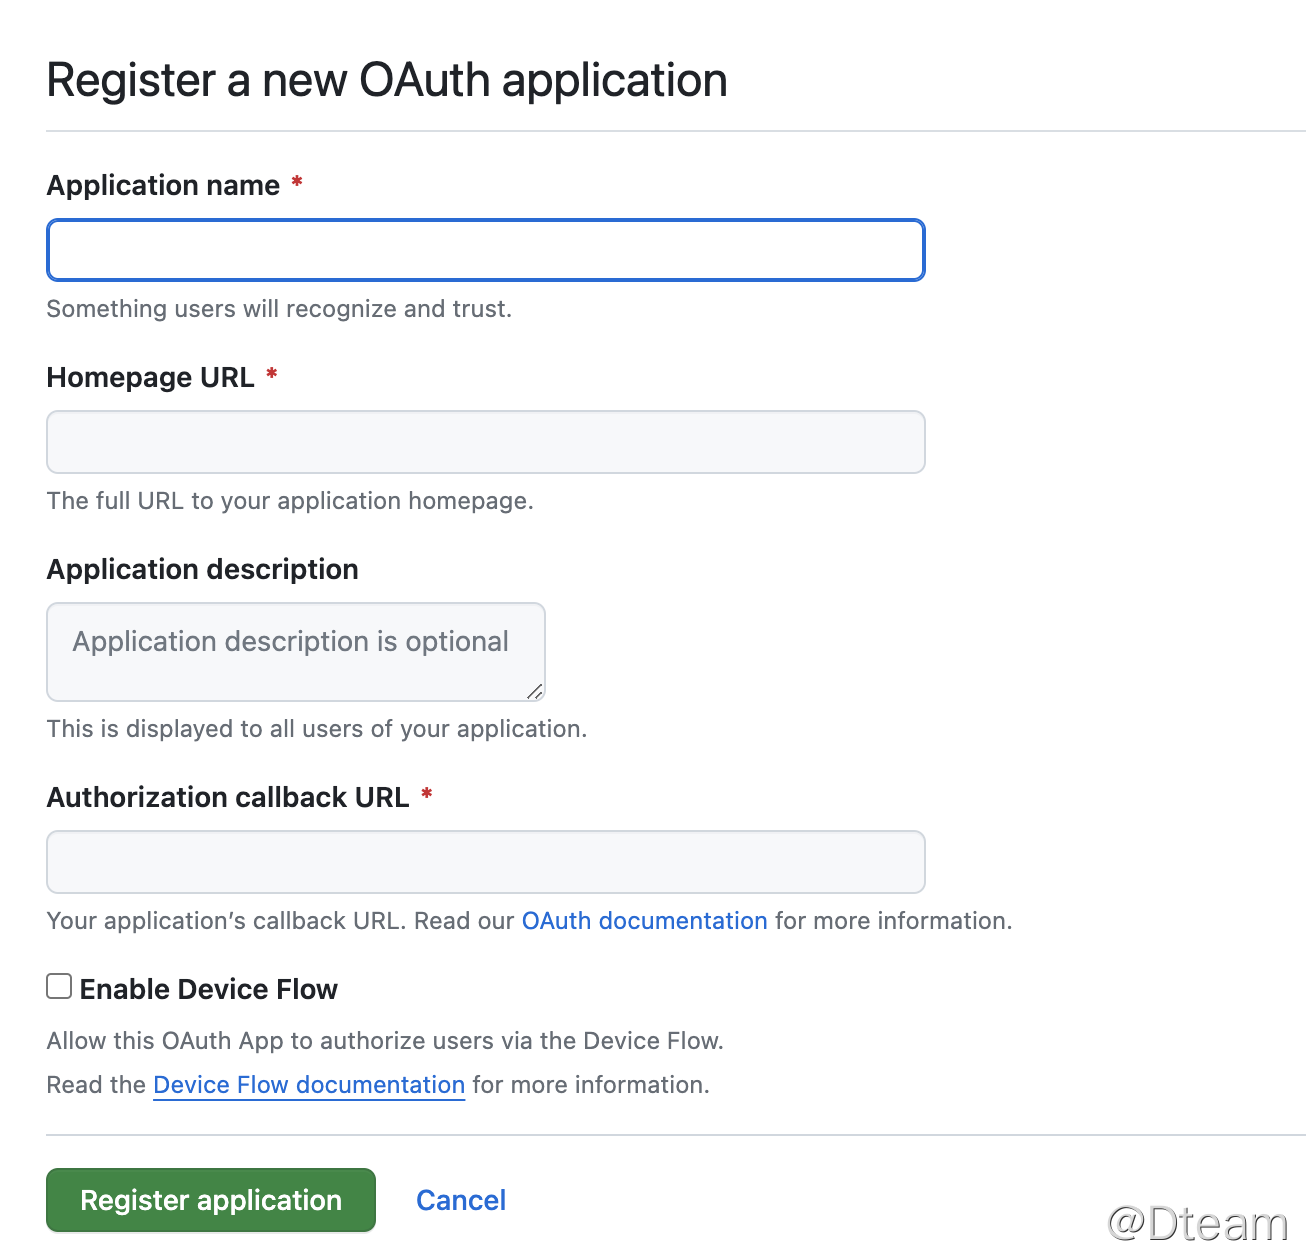
访问 https://github.com/settings/developers, 创建 App。

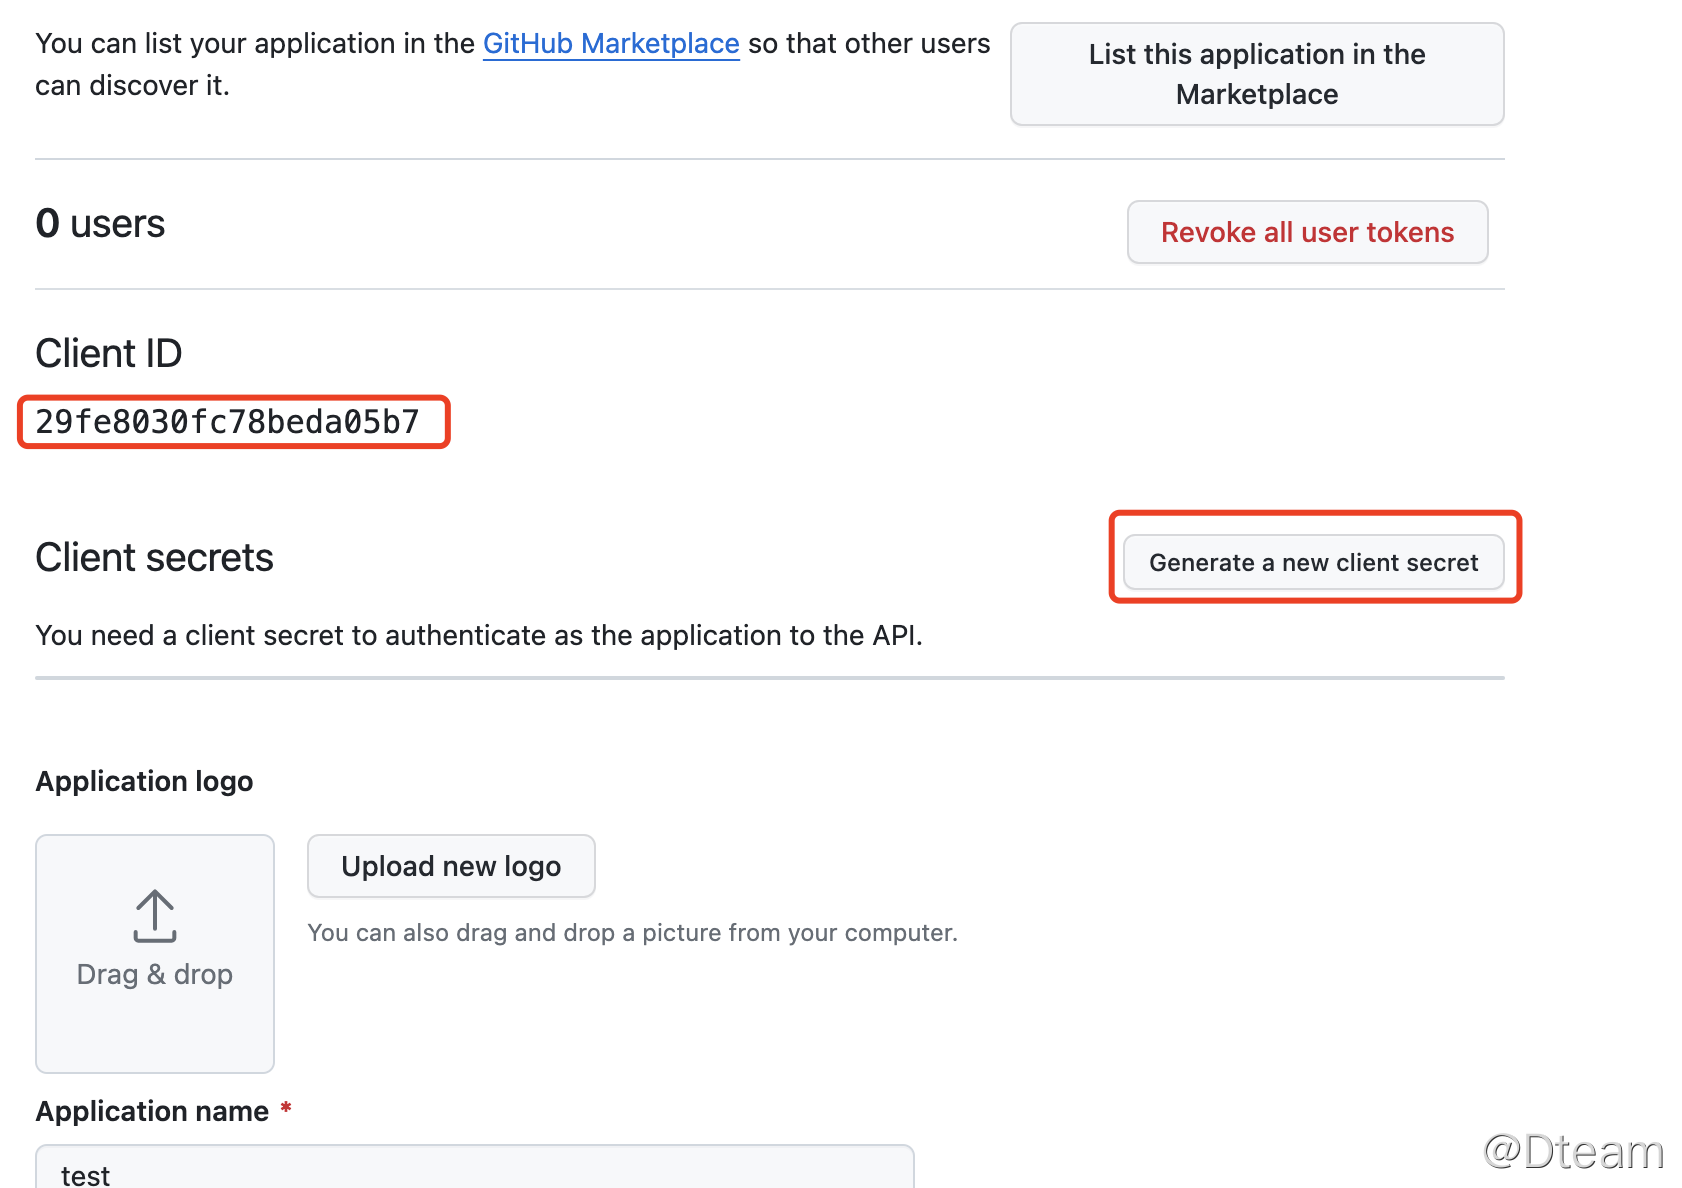
填入参数,提交后,会看到 CLIENT ID 。

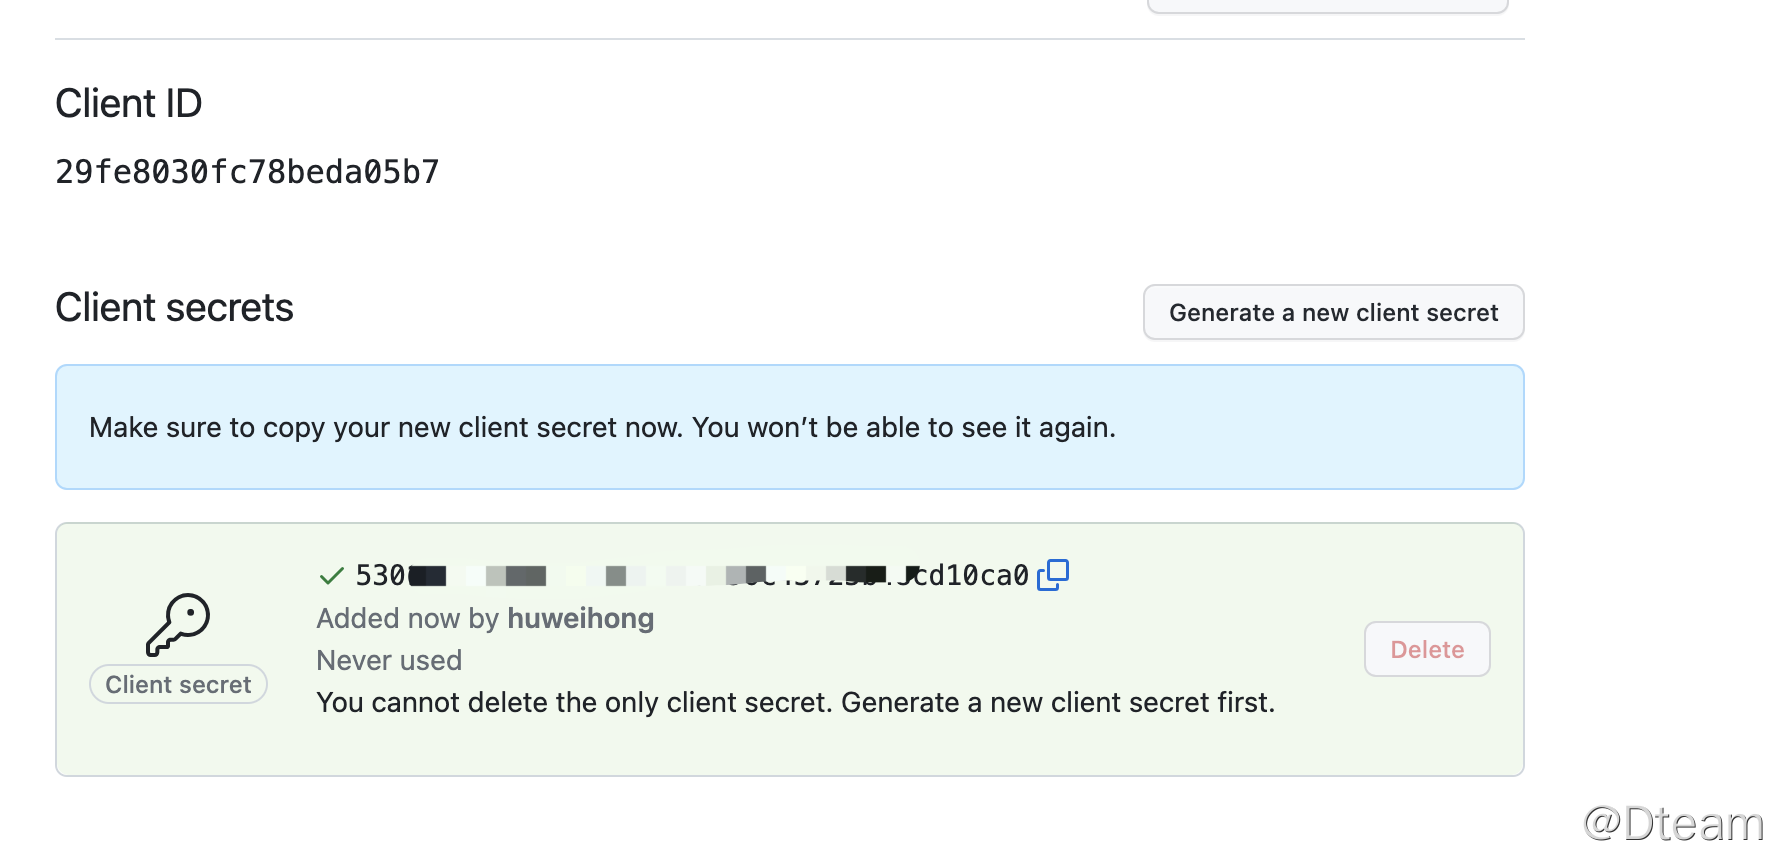
单击 Generate 按钮:

将 Client ID 和 Secret 拷贝下来。
使用 Passport OAuth2 进行认证
在代码中安装 Passport、Passport oauth2。
npm install @fastify/passport passport-oauth2 --save
创建文件 auth.ts 文件,用来设置 Strategy:
import passport from "@fastify/passport";
import { oauthConfig } from "../constant";
var OAuth2Strategy = require("passport-oauth2").Strategy;

export function useOauth(type: string) {
  passport.use(
    `${type}`,
    new OAuth2Strategy(oauthConfig[type], function (
      accessToken: string,
      refreshToken: string,
      profile: any,
      done: any
    ) {
      return done(null, accessToken);
    })
  );
}
创建 constant.tx 文件,设置 Discord、Github 配置:
export const oauthConfig: {
  [key: string]: {
    authorizationURL: string;
    tokenURL: string;
    clientID: string;
    clientSecret: string;
    callbackURL: string;
    scope?: string[];
  };
} = {
  github: {
    authorizationURL: "https://github.com/login/oauth/authorize",
    tokenURL: "https://github.com/login/oauth/access_token",
    clientID: "********",
    clientSecret: "******",
    callbackURL: "http://your-callback-root/auth/github/callback",
    scope: ["user:email"],
  },
  discord: {
    authorizationURL: "https://discord.com/api/oauth2/authorize",
    tokenURL: "https://discord.com/api/oauth2/token",
    clientID: "******",
    clientSecret: "******",
    callbackURL: "http://your-callback-root/auth/discord/callback",
    scope: ["identify", "email"],
  },
};
在 Server 中使用不同的 OAuth2 的 provider。
useOauth("github");
useOauth("discord");
为 Github 和 Discord 设置回调 api:
this.server.get(
  "/auth/discord",
  passport.authenticate("discord", { scope: ["identify", "email"] })
);

this.server.get(
  "/auth/discord/callback",
  passport.authenticate(
    "discord",
    {
      failureRedirect: "/",
    },
    async (request, reply, err, user, info, status) => {
      if (user) {
        //此处的user内容就是useDiscord中done返回的内容,我们这里将其转成JWT后作为accessToken返回给前端
        const token = await jwt.sign(user, YOUR_JWT_SECRETE);
        reply.redirect(YOR_FRONTEND_URL + `/?access_token=${token}`);
      }
    }
  )
);

this.server.get(
  "/auth/github/login",
  passport.authenticate("github", { scope: ["user:email"] })
);
this.server.get(
  "/auth/github/callback",
  passport.authenticate(
    "github",
    {
      failureRedirect: "/login",
    },
    async (request, reply, err, user) => {
      const error = (request.query as any).error;
      if (user) {
        //此处的user内容就是useDiscord中done返回的内容,我们这里将其转成JWT后作为accessToken返回给前端
        const token = await jwt.sign(user, YOUR_JWT_SECRETE);
        reply.redirect(YOR_FRONTEND_URL + `/?access_token=${token}`);
      }
    }
  )
);
同样需要在后端添加一个验证 AccessToken 的 Api,这里 Api 兼容 Github 和 Discord :
export const verifyAuth: Action = {
  path: "/verify/:type",
  method: "get",
  options: {
    schema: {
      params: z.object({
        type: z.string(),
      }),
      querystring: z.object({ accessToken: z.string() }),
    },
  },
  handler: verifyHandler,
};

async function verifyHandler(
  this: FastifyInstance,
  request: FastifyRequest,
  reply: FastifyReply
) {
  const { type } = request.params as { type: string };
  const { accessToken } = request.query as {
    accessToken: string;
  };

  try {
    const user = await verifyAccessToken(type, accessToken);
    return reply.status(201).send(user);
  } catch (e) {
    return reply.status(400).send({ error: "Invalid accessToken" });
  }
}
const verifyURL: {
  [key: string]: string;
} = {
  github: "https://api.github.com/user",
  discord: "https://discord.com/api/users/@me",
};

async function verifyAccessToken(type: string, accessToken: string) {
  try {
    const res = await axios.get(verifyURL[`${type}`], {
      headers: {
        Authorization: `Bearer ${accessToken}`,
      },
    });

    let result = {};
    switch (type) {
      case "discord":
        result = {
          value: `${res.data.username}(${res.data.id})`,
          email: res.data.email,
        };
        break;
      default: //github
        result = {
          value: `${res.data.login}(${res.data.id})`,
          email: res.data.email,
        };
        break;
    }
    return result;
  } catch (err: any) {
    throw new Error(err);
  }
}
总结
对于需要多种 provider 的 OAuth2,可以直接使用 Passport OAuth2,减少了代码量。
参考
觉得有帮助的话,不妨考虑购买付费文章来支持我们 🙂 :
付费文章